First tip – don’t fall out! I love photographing landscapes and cities from above in helicopters, planes etc. and if I could have my own helicopter and pilot for a whole trip I would. I’ve done enough flights now that I want to share a few tips with you. Some of the advice are for photographers like me who have to go on scenic flights and can’t afford to just rent my own aircraft to fly me and just me around a whole day – but most of the advice will work for everyone. Scenic flights can be expensive so I’ll try to help you get the most out of them.
I’ll start off with a shot that I really like and that I’ve just processed. It’s the gorgeous and magnificent domes of Kata Tjuta in Australia shot from a helicopter at sunset with my Canon 5D and 24-105mm L f/4.0 lens. Click to see larger size on my gallery.
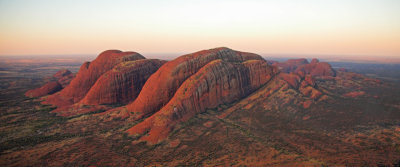
The 500 meters tall domes of Kata Tjuta at sunset
PRE-FLIGHT and IN-FLIGHT
- Reflections. Especially bad in old fixed wing planes with old scratched windows. The curse of the plexiglass can ruin any good photo! A lot of the following tips deal with how to avoid them!
- If you can get a flight with the doors off then do it – and strap yourself in with a harness or something, it’s very possible to unbuckle your seatbelt with your camera strap! I’m sure you will get some great shots if you fall out but they will be your last!
If you can’t fly with the doors off then some of the modern helicopters used for scenic flights actually have windows. - Talk to and befriend the pilot, tell him you’re a photographer etc. Most of them are happy to help you get shots.
- If you’re sharing the flight with other passengers try everything you can (beg, bribe etc!) to get the front seat next to the pilot – it’s by far the best. Watch your feet and hands though as you sit in the front, the pilots usually don’t like it when you help fly the plane!
- Consider when you want to go. Sunrise and sunset has the gorgeous light of course but do pose big problems with reflections since the sun is shining directly into the helicopter or plane meaning everything reflects into the windows. I always go for sunrise and sunset light, but it does mean that half the time you can’t shoot much because you’re pointed straight into the sun.
- Wear dark clothes with long sleeves, take off your watch etc. This does help A LOT actually. A light coloured T-shirt and your watch etc. will create big intrusive reflections, dark clothes do not reflect as much light.
- If you can’t get the seat next to the pilot then make sure you sit on the opposite side of the pilot. The pilots always have a tendency to turn the aircraft away from themselves allowing the max number of passengers to see on the other side. Not great though if you’re stuck in the same side as the pilot!
- Test your headset, make sure it works so you can talk to the pilot during the flight.
- Have all your gear prepped and ready! You don’t want to change memory cards and lenses etc when flying if you can avoid it. Measure the light just after take-off, select appropriate iso setting etc.
- Shutter speed. Helicopters are actually very steady and you can get good sharp shots at low shutter speeds like 1/100 or even lower. Planes are much more unsteady and you need at least 1/250 and preferably higher.
- Aperture. If your lens is sharp wide open then shoot at a wide aperture like f/4.0 or f/2.8. You need it to get a fast shutter speed and this also greatly minimizes the chance of getting sharp well defined reflections in your shot (since everything close to you will be very out of focus).
- Lens. This is a tough one. You need a good all-round lens for this. I usually shoot with my 24-105mm L f/4.0 lens, it’s a great lens, gives me wide angle and some zoom. I have also used my 17-40mm L f/4.0 lens at times, it depends on what I’m shooting. Don’t fit a mega zoom, you really need a compact lens since there is usually no space in an aircraft to use a big camera with a big zoom.
- Lens hood. A no brainer but use this! Very handy also for protecting the aircraft. If you scratch the window of a helicopter with your lens then the pilot will likely chuck you out the door. Those things are expensive!
- Polarizer filter. I’ve only used it for shooting the Great Barrier Reef from above otherwise I won’t bother. You have enough to concentrate and worry about while trying to photograph from the air without fiddling with a polarizer. Can also sometimes enhance window reflections, not really what you want!
- If you feel comfortable doing it, use manual focus and manual settings of aperture and perhaps shutter speed. Your camera’s light meter and autofocus can get really confused by the changing light conditions and reflections so manual control is better. You do have to be fast on the dials though. I normally go with manual aperture, manual focus and auto shutter speed which I measure manually using exposure lock button on the camera.
- Motion sickness. Helicopters are very steady, planes much more jumpy and unsteady and some places (see my previous post on Kakadu National Park) provide mega turbulence. It’s easy to feel a bit motion sick staring through a viewfinder even in a steady helicopter, so learn to shoot with both eyes open!
- Composition. Remember you can always crop later and remember to shoot heaps so you have lots of material to work with. Remember also that the rotor is hardly visible to the human eye as you sit in the aircraft – however on your photo at 1/500 of a second it’s very visible! So zoom in a bit and try to avoid getting the rotor in the top of your frame.
- Finally – Shoot!! Shoot away, machine gun your camera! You want to come home with lots of shots that you can edit and crop and work on later. Get heaps of shots, shoot shoot shoot!
AFTER THE FLIGHT
- Do make a note of what worked and what didn’t so you don’t repeat your mistakes next time.
- Remember to thank the pilot and get his card and give him yours, you might be back someday and maybe they’ll visit your site and remember you.
- Sometimes I get back from flights with shots that obviously are hero shots right away. Most of the time however photos shot from high altitudes need work before the hero shots emerges from the RAW files (you shoot RAW of course!). From high altitudes things get a bit hazy as well. Usually the white balance is off, the exposure is maybe a bit off, the contrast is lacking, the photos are a bit flat and lifeless – and quite often they need some cropping and straightening. So don’t feel disappointed, just get to work, your hero shots are in there in the RAW data but you have to dig it out (like any RAW shot really).
Example
After having read the above, look at my shot from Kata Tjuta again:
This is during sunset, with little but very gorgeous light so I am using iso 500 (which on the 5D is still very clean). I am sitting next to the pilot in a helicopter with no windows and with doors – I am shooting at f/4.0 with my 24-105mm lens through the glass and fighting reflections. I am using manual focus, manual aperture and auto shutter speed which I have measured off the rock using exposure lock. I am also shooting while our pilot decided to do a sharp turn to the left, throwing off the composition completely and tilting my shot 11 degrees! Even though the exposure and focus is spot on it’s almost a total failure, and I only managed this one shot from this angle because of the steep left turn of the helicopter. This is
very much a shot I had to rescue from the RAW file.
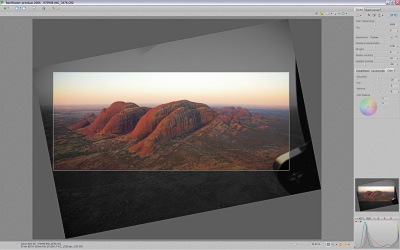
To show you the difference , here’s a screenshot from RAWshooter allowing you to see how I rotated this 11 degrees ( a lot!) and cropped to rescue the shot. I then cloned away the bit from the helicopter dash board in the lower right corner and I ended up with my hero shot!
I hope some of this is useful for you the next you’re photographing from an aircraft. Feel free to comment or email me if you have any questions, or want to share some great stories of shooting from above!
If you go to my website and view my Australia gallery I have many more shots of landscapes and cities from planes and helicopters.
4 Comments on “Hold on! Photographing from aircrafts!”
Fantastic tips! Lots to think about if I ever take to the skies…
Great shot. Amazing angle from the sky!
-Rich http://47photo.wordpress.com
Next Thursday the wife and I are heading to Hawaii for 10 days. I have booked a helicopter tour. This post will certainly come in handy and I have saved it to my desktop. I have sold all of my Sony mirrorless gear and am shooting an X-T2. I bought the wife an X-T20. Only because she does not really shoot but she wanted a Canon bridge camera. Grrrrrrrrr. What’s a guy to do? I rented the X-T20 for her and put it in automatic mode with the 18-55 kit lens. She loved it. Cool! I don’t see her hanging out of that helicopter though. And no she won’t surprise me. In fact she’ll be trying to pull me back in but will not succeed. So thanks Flemming.
I forgot I ever wrote this post 😀 Have fun on the trip!