Well, I did warn you dear reader that once I got my Wacom tablet I would be painting with light like it was going out of fashion! I guess I forgot to warn you that I would also be writing about it like writing was going out of fashion! Hence every second post now has ‘painted with light’ in the title and is about … painting with light (I desperately need a thesaurus!)
The latest RAW file to be run through my digital darkroom with newly added tablet is a sunset shot from Sydney from October 2007. It was a gorgeous sunset on a Friday night with some beautiful orange hues and a nice bit of cloud perfectly placed behind the city as seen from Milsons Point. I’ll kick things off with showing you the end result (click to see large):
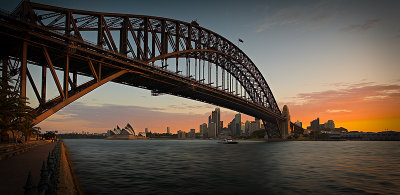
Sydney Harbour Bridge Sunset Panorama
Copyright Flemming Bo Jensen Photography
I am really happy with the result. I used painting with light subtly but I think the effect is remarkable. More about that in a bit.
One positive side effect to using the Wacom is that the digital darkroom in Photoshop is suddenly a lot more fun and so I am more creative. I always gave up trying to draw with a mouse (try drawing a circle with a mouse, impossible) and always had to stop short of how I actually wanted the photo to look. But with the Wacom I just put the tablet in my lap, lean back in my chair and draw like it was pencil on paper. I used to draw a lot many (many!) years ago so using the Wacom feels very natural to me. I find I use it for a lot of different stuff in Photoshop, lasso tool, brush tool, masking etc.
So what did my digital darkroom add to the Sydney photo? Here’s a screenshot of the photo from Pixmantec Rawshooter (one day I’ll switch to Lightroom but I so love Rawshooter, it is so blindingly fast compared to the sluggish Lightroom):
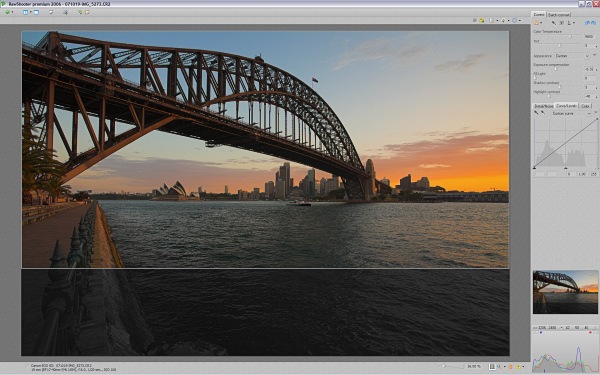
I composed this using the 17-40 f/4.0 L lens on my Canon 5D with a cropped panorama in mind – I always intended to crop the bottom. The exposure is spot on so I didn’t need to do much in Rawshooter. I have warmed the white balance, added a bit of contrast, saturated the colours, applied a bit of colour noise reduction and reduced highlight contrast. I created the crop I wanted and I then export the photo to a 16 bit TIFF file for further digital darkroom work in Photoshop – this is where the fun begins:
- I normally like water frozen in motion better than “long exposure” blurred water but in this case the water is bland. So I smoothed the water on a separate layer with a mask using a combination of motion blur and gaussian blur.
- I used the lasso tool (using tablet) to make some selections for creating vignettes. I added a 200 pixel feather and on it’s own desaturated layer I blended in the vignette to create a darkened effect. I repeated this 4-5 times with different size vignettes, different “lassos” and I have the vignette I want.
- And now “painting with light” (get me a thesaurus please!). Using different layers I use the dodge and burn tool on the tablet (with pen pressure set to change opacity) and I … paint with light! (there it is again).
- I specifically put some light onto the bright areas of the bridge structure where the sun hits and I also brightened the buildings, especially the Opera House.
- The top part of the sky was too blue, looking too much like daylight so I darkened it with a gradient layer and also desaturated a bit.
As I wrote earlier I am really happy with the result, I feel I accomplished what I wanted with this shot I actually made it look just the way I wanted. That doesn’t happen all that often, in fact that almost never happens. I’m a bit of a perfectionist when it comes to my own work so there are always many details annoying me (why I stopped drawing years ago) but the tablet certainly is a new favourite tool in my digital darkroom. Now I just need a thesaurus.
6 Comments on “Sydney Harbour painted with light”
Very nice image Flemming, I like the light hitting the bridge and think you have kept the effect nice, subtle and belieable! How often are you in Australia!?
Hi Thomas and thanks, glad you like the shot. I try and make it to 'godsown' (Australia) once a year!
nice and smooth Flemming
Thanks very much Christian!
Nice work. Love to see more details of your digital darkroom techniques. Great work.
Thanks very much Eric! Heaps more about my digital darkroom techniques here: http://flemmingbo.wordpress.com/tutorials/