 Previously I have blogged about A Two Toned World and Return of the Toned World so I messed up the sequence a bit, but this is the 3rd of my tutorials on black and white and can now only be called: Two Toned World Strikes Back!
Following in the footsteps of all the classic and contemporary black and white landscape photographers; I show you how to and create stunning black and whites from your digital images – click ‘Keep reading’ link.
I have worked hard on getting good black and white results from digital images for the past 6 months and I want to share my technique (donations in the form of sponsoring trips to the Australian outback greatly appreciated!). In August I delivered 5 beautiful black and white 100cm wide prints and recently I sold another 100cm wide duotoned print. All looked extremely good in print so I am now confident I have a workflow that works!
Conversion of your colour RAW image
I sometimes use Alien Skin Exposure 2 software as it is simply brilliant and has the advantage of being a Photoshop filter. Means you can easily do different conversions in different layers, like one conversion for foreground and one for sky, and blend them together. In an upcoming post about Windjana Gorge I will show you an example of this.
I am also amazed by the good results you can get using Adobe Lightroom 2 (and Camera RAW). For this tutorial I chose to work only in Lightroom since all Camera RAW users can basically follow everything except for using the TAT. TAT is Targeted Adjustment Tool; although TAT really sounds like something from Star Wars! Photoshop also has a black and white adjustment layer but even working on a 16 bit file I never really like the results. Creates far too much banding and other problems. I really recommend Camera RAW instead in Photoshop.
First of all, any black and white conversions must be done on the RAW file or a 16 bit colour file – or you risk running out of tones and produce banding very quickly. An 8 bit file does not have enough tones in the sky for example.
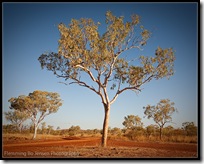
 I start with the original image as shown on the right. A beautiful majestic gum tree shot in The Kimberley, Western Australia. I really like the colour version as well (but then I’m obsessed with anything outback!) but it perhaps lack a bit of drama and mood and something ‘special’.
I immediately feel that this image is a good candidate for a black and white conversion. It has strong sunlight with high contrast and good shadows from late afternoon light. It has very saturated strong distinct colours with a lot of tones to work with in the conversion. And it has a simple composition where black and white can perhaps simplify it even more and add drama. I quickly create a virtual copy in Lightroom and go to work.
Using Lightroom – and Camera RAW – for black and white
In Lightroom and Camera RAW you use the “HSL/Color/Grayscale” panel to convert to black and white. Simply click Grayscale to convert your photo to grayscale. Now the fun begins as you use all the colour sliders to create exactly the look you want! If you’re a Lightroom user, the TAT tool makes it even more fun. Simply enable TAT and now you can click on the part of the image you wish to change. Click and hold left mouse button and you’re directly adjusting whatever colour you clicked on in the image. Now move your mouse up and down to either lighten or darken this area. Example; click on the sky, hold left mouse button and drag mouse down – and see the sky darken as you adjust the blue channel! Click on tree and move up and the tree is brightened! It’s a great and intuitive way of doing adjustments! Camera RAW users have no TAT tool so you’ll have to move the sliders the old fashioned way!
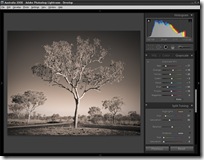
 If you click the image to the right you’ll see my shot in Lightroom and the sliders. I will go into more depth here about what I did with the colour channels; split toning and vignette:
Red: Usually has most of the luminance information in any landscape shot in sunlight. In my photo, the red is mostly the dirt so I darkened it a lot to create a dark road for contrast.
Orange: Also a lot of luminance in any photo with sunshine, in this photo the orange affects mostly the tree as it is lit by the sun so I brighten it slightly.
Yellow: Normally, controls all the greens. Yes; green is not green; it’s mostly yellow! In this case I darkened the yellow a bit so the leaves do not become too bright.
Green: Very little green in this photo so almost left the channel at 0. Usually the ‘green’ leaves in any shot are mostly made up of yellow and blue, not the green channel. So you’ll find the green can often be left alone.
Aqua: Not much aqua either, although usually there will be some aqua in the sky. Here the sky is very much Australian outback deep blue.
Blue: I darkened this a lot to create the very dark dramatic sky. This can be done without banding as we’re working on a raw file. On an 8bit file you’d create a world of problems doing this.
Split Toning: In this image I felt that duotoning worked great. For some images it looks wrong, for this image I love the effect. Split toning is colour toning the highlights and/or shadows. In this case all shadows are left black but all highlights are given a warm brown colour with quite a bit of saturation. I feel it works here as the image is warmed and you still have the feeling of the sun hitting the tree.
Vignette: This image calls out for a strong vignette with my bullseye composition. It is super easy in Lightroom using the “post-crop vignette” sliders. In Photoshop; you need to create your own. Here’s my technique: Create a duplicate of the image as new layer. Use the lasso tool to draw an ellipse selection for creating a vignette. Add a 250 pixel feather. Press backspace to knock out center. Desaturate the layer (very important for colour images). Change blend mode to Multiply and adjust opacity.
White balance: Don’t forget that white balance even on a black and white image has a huge impact on the look of the photo. Warm the white balance and the whole photo has a red/orange look with very few blue tones. I usually try to select as neutral a colour balance as possible. I want the colours as clean as possible so the sliders can work to full effect on isolated elements, for instance I want the sky a clean blue and not a warm blue. For daylight shots something around 5500-6500 kelvin is good.
The secret of digital black and whites
C
olour channel adjustments is the very key to good black and white conversions! Adjust all channels and notice how it affects a particular area of your photo. Moving the slider to 100 and back quickly makes it much easier to spot what you’re adjusting. Now; decide if that area should be darker or lighter and work all channels like this. Zoom in to 100% and watch carefully for nasty side effects like banding; there’s such a thing as too much even on a raw file! Any of these side effects will definitely show up in large prints, so be very careful you’re not overdoing your adjustments. Looking good on screen is one thing; looking good on print is something else entirely!
After you’re happy with the channel adjustments you may need to add a bit more contrast or adjust black level to get enough contrast and light in the image. Be careful not to create a bland flat image, using the histogram as a guide you want all tones from black to white so use curves to boost contrast if needed.
The result
I hope this trilogy of black and white tutorials have been of some help and inspiration. I for one am thrilled I have learned to do gorgeous black and white prints from digital files. On my recent photo expedition to The Kimberley in Western Australia I shot quite a bit of stuff in the very harsh strong midday light visualising gorgeous duotoned results in my head!
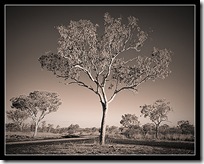
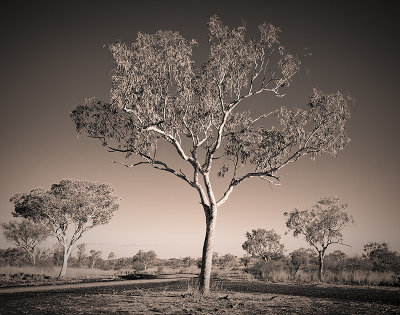
As for the result; you’ve already seen it but here it is in it’s full glory. It is a straight export from Lightroom, needing no Photoshop work at all.
A Glorius Duotoned Gum Tree in Kimberley, Western Australia:
Kimberley Gum Tree in Duotone
© Flemming Bo Jensen Photography
Do contact me with any questions or suggestions you might have; I’ll be more than happy to help and would love to hear your techniques and see your results!

19 Comments on “Two Toned World Strikes Back”
Beautiful work Flemming. Looks almost 3D!
Thanks very much Clayton!
A stunning conversion, and zero posterisation, as I always look out for! It was something which plagued my prints in the very early days, adding noise helped (and was often a look I was after anyway). I have really got into Lightroom's duotoning lately.
Nice to read your workflow- simple, quality and relevant.
Thanks heaps Steve! Yeah posterisation and banding will destroy any conversion. Your latest duotoned stuff on Pbase is gorgeous, you have a workflow that works as well obviously!
The outline of the tree is freaky, as Clayton said, almost 3D.
Clever work.
Cheers Thomas !
great shot Flem.
i like how the tree seems to mirror itself and shrink.
i get that feel from the trees on the left disappearing into the distance. not identical but they're as close as you'd get. my eyes keep going towards them down the line.
and good on ya again for sharing your secrets 🙂
Thanks very much Stephen ! I like sharing my photography 'secrets' on this blog, it's nok like I have found the secret of life or something 😀
I guess I should start charging admission though, or create a Paypal "Donate to Flemming's outback trips" button 😀
Very nice image and thanks for the tutorial Flemming ! I'll refer to it next time I try a conversion. I'll try and post some gum trees for you in the coming days…
cheers Tone! Look forward to more of your gum trees. Already own one wicked Tony gum tree 🙂
Thanks for the info mate ,
Never really do black and white but will have to give it a go some time
Thanks Kirk, and yeah give it a go – I'll be happy to help if you have any questions!
Nicely done. I liked your placement of the trees.
nice work. the vignette can also be added using Camera Raw.
Thanks Roy and you're right, Camera RAW (being the same as the development module in Lightroom) can also be used as a very easy way to create vignettes.
Nice work…I recently discovered your site via Flickr member. BTW, sneaky background on your site of a tiny tiny tiny happy face to the right of the site, hahahahaha. Great work. Looking forward to seeing more Tuts and thanks so much for sharing.
Thanks Eric !
That smiley is actually not mine, it's a WordPress thing, something to do with their stats counters.
So after you twitter I came and read again to see if I'm missing something from your post.
You can also drop all the saturation sliders to 0 and then you can play with both hue and luminosity to get even more control.
hi James. Not quite sure what you mean, there are no saturation sliders in grayscale mode? Only grayscale mix sliders.
EDIT: Too early for me to post, brain still needs coffee to work…now I see. Just as you say. Not in grayscale mode, but dropping all sliders to 0…got ya. Too early, need more coffee!