Earlier this year I wrote a blog post about stitched panoramas that focused mostly on all the little tricks you need to remember when you are shooting the soon to be stitched photos in the field. The shooting part is still essential. Get everything right in the field and you’ll be laughing come stitching time!
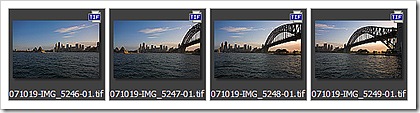
This post focuses on stitching the shots and is a tutorial showing you how I get from these 4 developed RAW files:
to this final photo as seen in my previous post:
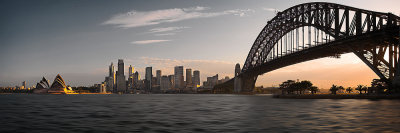
Sydney Skyline at Sunset Panorama
Copyright Flemming Bo Jensen Photography
It’s a long tutorial, so I split this post in two; click the “Keep reading” link to, well, keep reading!
Shooting
This is a simple panorama, just 4 horizontal shots. Normally I would shoot the single images vertically and I fail to remember why these are shot horizontal. I do however find I get more noticeable distortion in architectural shots when I stitch vertical images so that’s probably why I shot these horizontal.
Develop RAW files
The RAW files were developed in RAWshooter Premium (I now use Lightroom 2.0) and the important thing to remember is you can make all the changes you like to the raw files – just copy and paste the settings to all of the shots making sure that they are developed 100% identical! Rawshooter, Lightroom etc. all have the option of copying and pasting settings and do double check before exporting that they’re all identical. I export the raw files to 8 or 16 bit tiff files (depending on how much post production I think I am going to do).
Stitching in PTgui
PTgui is my panorama stitching tool of choice and here’s a step by step of how I use PTgui for a stitch like this:
- Switch PTgui to Advanced mode by clicking the “Advanced >>” button
- Load the images into PTgui! Select all 4 files, PTgui will automatically detect the correct order.
- PTgui will read the exif info so just click ok to the Camera /Lens data window.
- Click “2. Align images…” button to have PTgui automatically find control points and do the first alignment.
- The Panorama Editor will popup after the alignment but at this time I just close it again. If PTgui has guesstimated a wrong projection, say Rectilinear instead of cylindrical I will change this at this point. Rectilinear is good for narrow architectural stitches because it keeps every line straight at the cost of some or a lot of stretching of the image at the corners. Cylindrical is what I almost always use.
- Go to “Source Images” tab and note the image id of the image which is the anchor image of the stitch (often the middle shot).
- Go to “Optimizer” tab and in Anchor image drop down select the anchor image id you just spotted on the “Source Images” tab
- Now click “Run Optimizer” to optimise the image around the anchor image. This I feel is an important step, the anchor image is the image which receives no yaw, pitch or roll optimisation so it does make a difference which images you choose.
- Go to “Control Points” menu and select “Delete Worst Control Points”. This will automatically remove the worst control points, so you don’t have to do it manually.
- Press OK to reoptimize and hopefully the Optimizer will now tell you the result is good or very good!
- Back to “Project Assistant” tab and now click “Align Panorama…” button. Don’t click “2. Align images” button or you’ll have to start over! Just click Align Panorama to popup the Panorama Editor:

- I have already chosen the correct projection in step 5 so at this point I am only interested in aligning the panorama to get my famous straight horizon (copyright the Human Spirit Level) and lines as straight as possible. Click and drag the image to center it and straighten lines. When you’re happy with how it looks, close the window.
- Time for a preview! Go to “Preview” tab and create a preview. I have a lovely Samsung 24″ widescreen monitor so I want a big preview, 1920 pixels across to fill the screen. Select the largest size your screen will show.
- PTgui will quickly create a preview and show it to you and this is where you spend some time with your nose almost touching the screen. Carefully go over the preview, look for any stitching errors. Then step back from the screen and check if the lines and horizon look straight.
- If the alignment is slightly off go back to Panorama Editor in step 12.
- If you spot stitching errors you need to work on the control points manually. Now this is where PTgui takes a bit of practice because the “Control Points” tab can get confusing. But get the shooting part right very rarely will you need to touch this tab. If you do, you need to get comfortable with adding, editing and removing control points between the images.
- With a very wide panorama you may need to add horizontal control points to keep the horizon straight. PTgui doesn’t know it’s a horizon so you need to tell it “please don’t bend this line, it’s a horizon!”. This has to be done manually but fortunately there is an excellent levelling tutorial written by John Houghton and you find it here. Follow it very carefully or it won’t work at all.
- If you made changes it’s a good idea to re-optimize on the Optimizer tab.
- Do another preview and keep going back and forth till your happy. Again, if you got the shooting part right you won’t need to do manual changes, you’ll be laughing and let PTgui do all the work.
- Now if you have moving elements in your panorama you may find in the preview you have a person with half a head, or half a car on a street. This is easier to fix in Photoshop, so just ignore for now.
- Finally; create your panorama on the Create Panorama tab. I export at maximum size (no point in downsizing, we want all those lovely pixels!). If I spot no stitching problems (no people or cars cut in half etc) I export in TIFF and blended panorama. But if I need to work with the layers, I export as PSD and export individual layers only. That way you can follow this tutorial and edit the seams using masks in Photoshop.
- I leave everything else on the the Create Panorama at default, just change Interpolator to “Lanczos” and then I click “Create Panorama”
- That’s it! Quite a few steps but normally it’s super easy if I did my work in the field ok, it’s all click click and let PTgui do all the work. Of course I go through the finished file at 100% in Photoshop and if I spot big errors I go back to PTgui to re-stitch.
Finalizing in Photoshop
After PTgui has performed it’s many magic tricks I ended up with this perfectly stitched panorama:
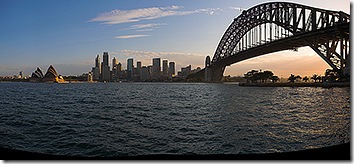
It’s a perfect stitch but an imperfect picture. It still needs work,
especially some cropping. So I bring the file into Photoshop CS3 and perform this:
- Crop! Very first thing I do is to crop the photo, I have stuck the horizon in the middle when I shot it to minimize distortion but I don’t need that large chunk of boring water at the bottom. So I crop the bottom and leave the horizon at about 2/3 from the top.
- Healing and cloning as always. I do clean my sensor from time to time but all shots need healing and cloning of spots etc. and in stitched panoramas the spots are repeated in every shot of course.
- I didn’t have an ND filter with me when I shot this to lengthen exposure and smooth water so I’m left with a choppy colourless water. Normally I like water frozen in motion because of the texture but here’s it’s too choppy and chaotic and not enough reflection. So I simply created a layer with a mask and applied some motion blur and gaussian blur and blended the layer in at about 90%
- I have this thing at the moment for grey vs orange colours in my sunset shots so I almost completely desaturated the blues and the cyans and created a very different desaturated sky and water.
- The buildings are mostly in deep shadow so I painted some light onto them using my Wacom tablet.
- I wanted to enhance the orange colour so I switched to lab mode and then used “apply image” and soft light blended in the b channel.
- I created a local contrast enhancement using an unsharp mask of around 25,25,0.
- Final touch was a few different vignettes added by duplicating the layer, drawing a vignette using lasso tool, adding 250 pixels of feather, pressing backspace to knock out the center. Now desaturate this layer and change blend mode to multiply – voila!
Result
It was a bit of a journey, from shooting the photos in Sydney Harbour to developing the final result in my digital darkroom in Copenhagen, Denmark:
Sydney Skyline at Sunset Panorama
Copyright Flemming Bo Jensen Photography
It can be quite a bit of work, but then darkroom work be it traditional or digital is and always has been an integral part of producing high quality shots that stand out. It’s the difference that makes the difference!
This tutorial can be downloaded in PDF format, click here
13 Comments on “Perfecting your stitched panoramas”
Thanks for the tutorial Flemming. There are a few things in there about PTGui I didnt know about. That tip about the anchor image is going to be useful.
Glad you found it useful Matt! Yes, anchor image makes a difference. Also I didn't go into the advanced bit of the Optimizer, there's a truckload more you can do but unless you really made a mess of things in the field you rarely have to touch these advanced options.
excellent post Flemming or should that be HSL man, I'm with Matt, didn't know all that stuff. Will be having a play with it tomorrow. Boy I know nothing, I click three buttons and its done. Good to know how to do it right. Cheers
Thanks very much Christian, glad you enjoyed it! Your panos are brilliant so the 3 buttons you push are obviously the right ones. Although you seem to lack a "straighten horizon" button hehehehe. If you want I can do a special post for you on how to straighten your horizon 😀
Yours truly, Human Spirit Level Man
Great post Flemming ,I do all that stuff every time I stitch a pano (Yeah Right!!!) No I'm a 3 button man as well but might give this a go.
Maybe it's time to give you an Aussie nickname Flemming.
I think we would come up with something like… Theo……short for theodolite ( thee-odd-oh-lite n surveying intrument for measuring angles. Collins English dictionary.)
"What do ya reckon Theo me old mate, is she straight or what"!!!!
Thanks Merv!!!…Dunno about Theo though…somehow I don't feel like a Theo. It'll be confusing to Aussies anyway: "Is your name not Bruce then?"
Perfect timing for me Flemming as I just purchased PTGui yesterday. Thanks for posting this tutorial.
Glad you liked the post Graeme, have fun with the amazing PTgui and feel free to email me with any questions!
Awesome post, will be using this next time I open PTGui 🙂
Excellent!!!!!!!!!!!! I have been wondering how to fix the odd photo that does get stretched at the edges!!!!!!!
You should make like a word document or whatever so its easily accessible to us PTGui amateurs
Thanks Dylan, great idea about the download. Have now added a PDF version, see link at the bottom of the post, or click here: http://flemmingbo.files.wordpress.com/2008/08/fle…
Great tutorial Flemming, thank you very much:) I will download the PDF for later use. I'll be using this to check some of my failed stitches and see if there's some improvement.
Thanks Matthew, hope it helps!